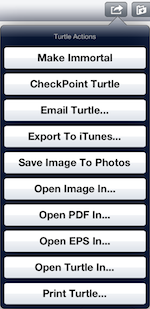
Make Immortal
This command will make a turtle immortal. If the turtle
is already immortal, then the action's name will be Make Mortal,
and the action will make the turtle mortal again. The
concept of immortality is discussed further in the help section on
Evolution Techniques,
but briefly, an immortal turtle cannot be
lost during evolution. It is never replaced by a child turtle.
Please note that a turtle's immortality is not remembered when
the population is closed, unless you checkpoint the turtle or
the population.
Checkpoint Turtle
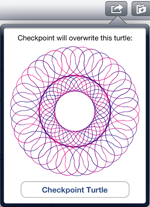
This action will checkpoint the turtle to the database. This will
also save the turtle's immortality setting. Before the checkpoint
is performed, you will be shown a popup showing you the turtle's
drawing using the program currently saved in the database. This will help
you avoid checkpointing a turtle whose existing program is one you
do not want to replace. Why is this important? Because the turtle that you are
currently looking at may be the great-great-grandchild of the
turtle that is currently saved in the database, and you may have
forgotten that the turtle's previous drawing is something that
you do not want to lose. If this is the case, simply click outside
of the popup to cancel the checkpoint, then use another means of
saving the turtle such as copying it to one of your gene pools.
Email Turtle...
This action will allow you to e-mail your turtle. The turtle's
drawing, definition file, and program text will be attached to the
e-mail, along with a PDF document containing the drawing, as well as an
Encapsulated Postscript file with the turtle's vector drawing. Once the e-mail
is constructed, you will be presented with the email modal screen
allowing you to specify the e-mail addresses of the recipients.
Then you can either send the email, or save the e-mail as a draft.
Export To iTunes...
This action will export the turtle's definition to a file in iTunes.
A turtle definition file can be shared with other users, as well as
imported back into one of your populations. When you select this action,
a popup will be displayed asking you to enter a name for the turtle
definition file that will be saved in iTunes. Once the file is
exported to iTunes, you can work with it using the iTunes File
Sharing area for the Evolved Art app.
Save Image To Photos
This action will save a copy of your turtle's drawing to the Photos
app on your iPad. Once this is done, you can open the Photos
app and use the turtle drawing in the same fashion you would any
other photo that you took with your camera. For example, once the
drawing it in your Photo Library, you can upload it to Facebook
using the Facebook app. Or you can include it in your Photo Library
slideshows.
Open Image In...
This action will open the turtle's image in another iPad app. When
you select this action, another popup will be displayed showing a
list of apps that are capable of opening an image. If you do not
see another popup, then there are no apps on your iPad that are
capable of displaying an image.
Open PDF In...
This action will open the turtle's image as a PDF document
in another iPad app. When
you select this action, another popup will be displayed showing a
list of apps that are capable of opening a PDF document, such as
Adobe Reader. If you do not
see another popup, then there are no apps on your iPad that are
capable of displaying a PDF document.
Open EPS In...
This action will open the turtle's image as a vector drawing within
an Encapsulated Postscript file in another iPad app. When
you select this action, another popup will be displayed showing a
list of apps that are capable of opening an Encapsulated Postscript
document. If you do not
see another popup, then there are no apps on your iPad that are
capable of displaying an Encapsulated Postscript document.
Open Turtle In...
This action will open the turtle's definition file in another iPad app. When
you select this action, another popup will be displayed showing a
list of apps that are capable of opening the definition file. The
turtle definition file is a text file that uses the XML standard. Since
Evolved Art is the only app that understands turtle definition files,
the only apps that will be displayed are those that work with generic
files, such as DropBox or Google Drive. If you do not
see another popup, then there are no apps on your iPad that are
capable of working with generic data files.
Print Turtle...
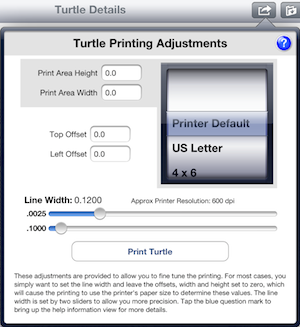 This action will print the turtle's drawing to a printer. Printing is
a complicated process for a number of reasons. Printers have many different
capabilities and resolutions, paper sizes vary, and printer driver
software can be inconsistent. For example, my Epson printer provides
values for the paper margins when I print on US Letter sized paper,
but the actual printed turtle prints closer to the left side of the
paper then the reported margin, so the turtle is not centered on the
paper. Evolved Art addresses some of these issues by allowing you to
tweak the printing process using the settings in this popup.
While the popup appears a bit complicated, it is really straightforward.
This action will print the turtle's drawing to a printer. Printing is
a complicated process for a number of reasons. Printers have many different
capabilities and resolutions, paper sizes vary, and printer driver
software can be inconsistent. For example, my Epson printer provides
values for the paper margins when I print on US Letter sized paper,
but the actual printed turtle prints closer to the left side of the
paper then the reported margin, so the turtle is not centered on the
paper. Evolved Art addresses some of these issues by allowing you to
tweak the printing process using the settings in this popup.
While the popup appears a bit complicated, it is really straightforward.
The majority of the time, you can ignore the Print Area and
Offset fields (leaving them set to zero, which uses the defaults
provided by the printer), and simply set the Line Width sliders
to your desired line width, and print. The Line Width
sliders set the
thickness of the lines when printing the turtle's drawing.
As with all values in this popup, the line width is measured in
points, where there are 72 points in a physical inch.
Because the range of desirable line widths is large, and many times
the desired line width is a very small value, using a single slider
to set the line width makes selecting very small values extremely
difficult. For this reason, two sliders are provided. The top slider
sets the line width with precision of 0.0025 points, while the bottom
slider sets the line width with precision of 0.1000 points. The
actual line width is the combination of these two values. As you
move the sliders, you will see the actual line width value change
in the label above the sliders. You will also see that a approximate
printer resolution is provided for each line width. The
aproximate printer resolution does not affect your printer's
resolution setting in any way. It is telling you that the
current line width setting would print with a single dot on a
printer that has the approximate printer resolution. In other words,
when you set the line width to 0.1200, and the approximate printer
resolution shows 600 dpi, this means that a 600 dpi printer will
print the lines at it's maximum resolution, or a single dot. Of
course, if you set the line width to 1.000 points, and print on
a 600 dpi printer, the line width will actually be about 8 dots
on the page.
The calculation for the line width, in inches, is:
( line_width / 72.0 ). So if you set the line width to
0.1000, then the line will print 0.001389 inches thick
[ 0.10 points / 72.0 points_per_inch ]. To estimate
the number of printer dots that a line width represents,
you use the calculation:
( line_width * printer_dpi / 72.0 ). So, with
a line width of 0.1200 and a 600 dpi printer, then the resulting
lines should print with one printer dot:
[ 0.1200 * 600 / 72.0 ].
I provide these calculations for
those users who need precision, but most users will discover the best
line width for their printer by trial and error, and simply reuse that
value each time they print. Of course, some turtles will look better
with thinner lines and others will look better with thicker lines, so
there is no single line width that makes every turtle look best.
The Print Area input fields are used to set the
size
of the turtle printed on the physical page. Again, these values are
measured in points. Most of the time, you can leave these values set
to 0.0, which will use the printer's default page size for the turtle
print size. However, you may wish to undersize the turtle
to print a smaller turtle on a large paper size, or you may wish to
oversize the turtle to zoom in and focus the printing
on a specific part of your turtle. Of course, oversize will require
that you set the offset fields to properly place the part of the
turtle that is actually printed where you want it on the paper.
The paper size picker to the right of the print area input fields
will set the values of those fields to common paper sizes, allowing
you to then adjust them to your liking. The paper picker only sets
the values in those fields, and is otherwise ignored by the printing
process. Choosing Printer Default in the paper picker will
reset the print area values to 0.0, which causes Evolved Art to use
the paper size that the printer suggests.
The Offset fields are used to set the
location
where the turtle is printed on the physical page. When these values are
set to 0.0, the location will be determined by the printer's suggested
paper margins. However, there are times (for example, when you oversize
or undersize your turtle, or when the printer does not use the margins
that it provides to Evolved Art), when you will want to adjust these
values. As the names suggest, you can offset the turtle from the top
and left sides of the paper. These values will be added to the margins
that are provided by the printer. These values can also be negative, which
with move the turtle up (top offset) or left (left offset) on the page.
Once you have adjusted the settings to your liking, tap the
Print Turtle button, and the standard iPad Printer Options popup
will be displayed, allowing you to select your printer. Tap the Print
button, and your turtle will be printed.
As a side note, many people have printers that do not support Apple's
special AirPrint protocol, and therefore do not show up in the list
of available printers when they try to print. The folks at Netputing
provide a nice utility named HandyPrint
that allows you to share any printer connected to
your Mac with your iPad. I am not endorsing this product, but I have
been using it to test Evolved Art's printing function, and it appears
to work well. You can learn more about this product on their website
at http://www.netputing.com/handyprint/.
Another option for Mac users is Printopia, which is available
at http://ecamm.com/mac/printopia/.
I have never used Printopia.
Unfortunately, I do not have a Windows machine at my disposal, but
Windows users can do a Google search for "AirPrint Support Windows" and you
will find many links to various utilities that support sharing your
printer from Windows. It appears that the likely candidates are
Finger Print,
AirPrint Activator, and Elpamsoft's AirPrint Installer.
Finger Print appears to be the professional solution, but
again, I have not tried any of these products.
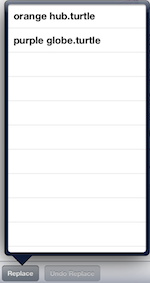
Turtle Replace Button
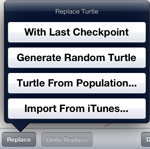
The Replace button opens a popup that displays an ActionSheet which
provides you with four methods for replacing the code of the turtle -
With Last Checkpoint, Generate Random Turtle, Turtle From Population,
and Import From iTunes. Note that when you
use the replace action, the turtle itself is not replaced, only the
turtle's program is replaced. This means that the turtle's Unique ID,
Author, and other information is left as-is.
With Last Checkpoint
This action will reload the turtle's program from the last time that
you performed a checkpoint and replace the current program. This is a
means of reverting a turtle checkpoint without having to revert the
entire population.
Generate Random Turtle
This action will generate a new random turtle program. This
is identical to the way that turtles are randomly generated when you
create a new population, except it operates only on the displayed
turtle. The randomly generated program will use the same parameters
as those used when the turtle's population was created.
Turtle From Population
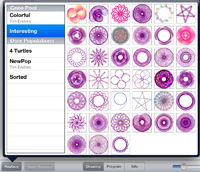
When you select the Turtle From Population action, you will be
presented with the Turtle Picker popup. This popup looks quite
complicated, but it is very simple to use.
The picker will list
all of your populations in the table on the left side. When you
select one of the populations from the table on the left side,
that population's turtles will be displayed to the right. Once
the turtles are displayed, simply tap on any of the turtle images
and that turtle's program will replace the current turtle's program.
If you wish to cancel the replace, simply click outside of the popup
and it will be dismissed and the replace will be canceled.
Import From iTunes
When you select the Import From iTunes action, you will be presented
with a new popup showing all of the turtle definition files that are
available from iTunes. Select any of the files and the turtle's program
will be replaced by the program from the turtle definition in iTunes.
There are two ways for a turtle definition file to be available in
iTunes: 1) you exported the turtle definition from Evolved Art; 2)
you copied the turtle definition file into Evolved Art's File Sharing
area using iTunes itself.
If you wish to cancel the replace, simply click outside of the popup
and it will be dismissed and the replace will be canceled.