Overview
The Population View displays a population and provides actions
to operate on that population. Evolved Art provides two
different types of populations, User populations, which
can be evolved, and Gene Pool
populations, which do not evolve. Because of the two types of
populations, this view will behave slightly differently depending
on which type of population is being displayed. The view always
shows all of the turtles in the population as tiles in a
scrollable grid.
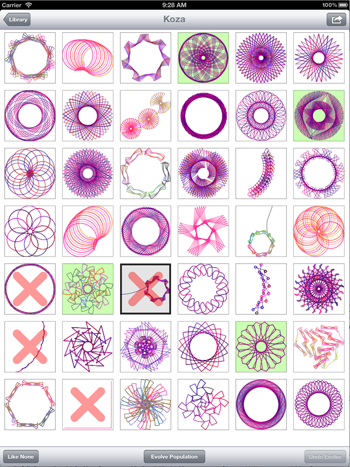
Turtle Tiles
In the population view, the population's turtles display their
drawings on tiles in a scrollable grid view. The currently
selected turtle(s) will have a light gray background and a thicker
border around them. Turtles that are not liked have
a large red X drawn over their drawing. If a turtle is immortal,
then its background will be a light green color. When turtles
are evolved, their tiles will flip over to display the next
generation's turtles.
Double tapping a turtle's tile will open the turtle in the
Turtle View. Single taps on a
turtle's tile behaves differently depending on the type of population
that is being displayed. When a user population is displayed, a single
tap will toggle the turtle's Like status.
When a gene pool population is displayed, tapping a
turtle will toggle it's selection state.
User populations do not have the concept of selected turtles,
while gene pool populations work in edit mode allowing
turtles to be selected for specific actions.
Controls
In the navigation bar at the top of the view, you will see two
buttons: Library and Action. The Library button is used to return
to the Library View from which this population was selected.
The Action button will display an ActionSheet providing you
with a number of actions that you can use to operate on the population.
In the toolbar at the bottom of the view, you will see either one
or three buttons. When a regular population is displayed, you will
see three buttons.
The left-most button is a Like button when a population is
displayed, and a Select button when a gene pool population
is displayed. The center button is the Evolve button used
to evolve the next generation of turtles. The right-most button is
the Undo button used to revert an evolution back to the
previous generation.
When a gene pool population is displayed, you will see only one
button on the left - the Select button.
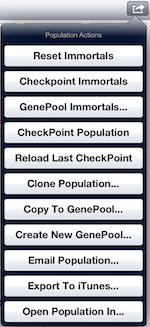
Reset Immortals
This command resets the immortal status of all immortal turtles
in the population, making them mortal. The immortal status of the
turtles is not saved to the database, so they will be reset to mortal
the next time you load the population. To save their immortal status,
you need to checkpoint the immortal turtles.
Checkpoint Immortals
This command checkpoints all immortal turtles in the population,
saving them to the database. Checkpointing turtles also saves
their immortal setting so the immortals will remember their
immortal status when you reload the population.
GenePool Immortals...
This command copies all immortal turtles into a gene pool population
that you select. When you select this action, a new popover will be
presented listing all of your gene pool populations allowing you to
select the gene pool population into which to copy the turtles. Note
that if any of the turtles being copied have a unique identifier that
matches a turtle in the destination population, then those turtles
will be assigned new unique identifiers so that they will not overwrite
the existing turtles in the destination gene pool.
Checkpoint Population
This command checkpoints the population, saving it into the database.
Checkpointing the population ensures that you will not lose any of the
turtles as they currently exist in the population. Checkpointing also
saves the immortal status of the turtles in the population. Please note
that checkpointing the population overwrites the turtles that were saved
into the database when you last performed a checkpoint. If you are not
sure if you will overwrite an existing turtle that you want to save, you
can checkpoint individual turtles, which displays a popup showing you
the turtle that the checkpoint will overwrite.
Reload Last Checkpoint
This command reloads the population from the last checkpoint. All of
the current turtles in the population will be replaced with those that
were saved to the database the last time you performed a checkpoint of
the population. The immortal
status of the turtles will also be reset to the last checkpoint.
Clone Population...
This command allows you to clone the population, creating a new
population containing all of the current turtles in this population.
This is convenient if you do not wish to overwrite the population's
turtles with a checkpoint, but do want to save the current generation's
turtles. It also
allows you to branch populations at specific generations.
When you select this command, the New Population popup will be
presented, allowing you to set the population size, as well as
the various probability and fitness parameters for the new population.
This allows you to give the cloned population different parameters
for when it evolves. If the new population has a smaller population size
than the existing population, turtles will be selected from the
beginning of the population until the new population is filled.
If the new population size is greater than the existing population,
new turtles will be generated to fill in the additional turtles
after the existing population's turtles are copied into the new
population.
Copy To Gene Pool...
This command allows you to copy all of the turtles from the
displayed population into an already existing gene pool population.
This will present the gene pool selection popup allowing you to
select the gene pool into which the turtles will be copied. You
can select an existing gene pool, or use the Create New
Gene Pool control to create a new gene pool, which will be
added to the list for you to select.
One thing to note is the handling of duplicate turtles existing
in the destination gene pool population. When a turtle exist in the
destination gene pool population that has the same unique identifier
as a turtle being copied, the copied turtle will be assigned a new
unique identifier. This can create duplicate turtles in
the selected gene pool, if you previously copied the current population's
turtles to the gene pool. Thus, it is more precise to copy individual
turtles to a gene pool. However, if the gene pool is newly created, or
if you have never copied turtles from this population into a gene
pool, then duplicate turtles should not be a problem.
Create New Gene Pool...
This command allows you to create a new gene pool population
consisting of every turtle in the displayed population. When
you select this action, a popup will appear prompting you to
provide a name for the new gene pool population. Once you provide
the name, the gene pool population will be created and added
to your library.
Email Population...
This command will generate a population definition file that will
be attached to an e-mail message. The e-mail will also have an
attachment of a PNG image showing a preview of the population's
turtles. Once the e-mail is created, you will
be presented with a modal dialog to allow you to specify the e-mail
recipients and send the e-mail to them.
Export To iTunes...
This command will generate a population definition file to be
exported to iTunes. Before the file is generated, you will be
presented with a popup prompting you for the file name to use
for the file being generated. Once you provide a file name, the
file is generated and exported into the iTunes File Sharing area
for the Evolved Art app.
Open Population In...
This command will generate a population definition file to be
opened in another iPad app. Once the definition file is generated,
you will be presented with a popup listing apps that are capable
of opening the file. Since Evolved Art is the only app that knows
how to operate with a population definition file, the only other
apps that will be capable of opening the file will be those that
deal with raw data, such as DropBox or Google Drive.
This action allows you
to upload a population definition file to DropBox or Google Drive
to share with other users or as a backup.
Like/Select Button
The Like/Select Button operates differently depending on whether the
current population is a normal population or a gene pool population.
The reason for this is two-fold. When a normal population is displayed,
the most common operation is to like or not like
turtles to guide the population's evolution. However, when a gene
pool population is being displayed, turtles are selected or not
selected to prepare them for a particular action, and because the
population cannot evolve, the like button makes no sense.
When a normal population is displayed, the button will display the
titles Like All and Like None. Like All is displayed
when less than half of the population is currently liked
and Like None is displayed when more than half of the population
is currently liked. As their titles indicate, Like None will cause
all turtles to be not liked, and Like All will cause all
turtles to be liked.
When a gene pool population is displayed, the button will display
the titles Select All and Select none. Select
All is displayed when less than half of the turtles in the population
are currently selected. Select None is displayed when more than half
of the turtles are currently selected.

The Gene Pool selection popup will be displayed any time that you
need to select a gene pool for an action - for example when you copy
a population's turtles into a gene pool. Simply tap on one of the
gene pools listed in the popup and that gene pool will be selected
as the destination for your action. Each gene pool will indicate
the number of turtles already existing on the gene pool in the
small text label under the gene pool's name.
There are times when you may wish to select a gene pool as your
destination, but the gene pool's name is disabled with a message
indicating that the gene pool has reached it's maximum size.
Gene pool's are limited to 120 turtles in size. Sometimes all
of your gene pools are full, but you still wish to perform the
current action. When this happens, you can use the special
Create New Gene Pool control at the bottom of the popup
to create a new gene pool
without having to leave the popup. Simply enter a name for
the new gene pool in the text field, then tap the
New button, and the
gene pool will be created and added to your library and
to the popup's list of gene pools. Then you can select the
newly created gene pool as the destination for the current action.