Overview
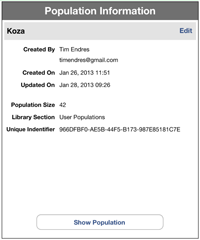
The Library View displays your library of populations. It also
provides a view to display the details of a population, such as
its author, size, and dates of creation and last update. It also
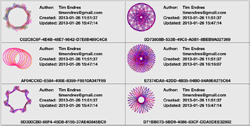
provides a preview view which shows the turtles in the population.
These three views allow you to navigate and investigate your
populations.
The Library View also provides four buttons that provide for creating
and importing populations, configuration of your
app's settings, a slideshow feature, and general information
including these help pages.
Subviews
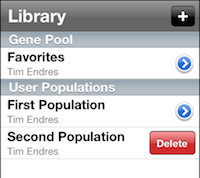
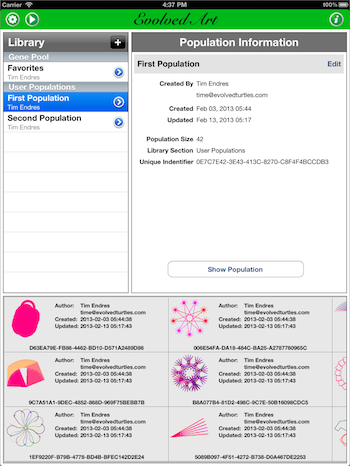
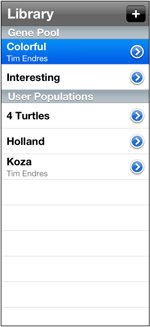
The Library View has three subviews. The Library List, the Population
Detail view, and the Population Preview. The Library List is presented
as a table on the top-left. The Population Detail view is presented
on the top-right, and the Population Preview is presented at the
bottom. When you select a population in the Library List, the population's
details are presented in the Population Detail view, and its turtles
are presented in the Population Preview.
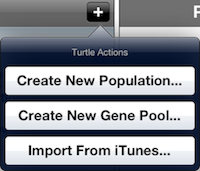
At the top of the library List, you will see an Add button that
is the familiar iPad '+' 'button used to add contacts or other items in
most iPad apps. Clicking this button will present an action sheet
allowing you to create a population, a gene pool, or to import a
population definition file from iTunes as a population or gene pool.
At the top of the screen, you will see a gear button, which you can tap
to open the Configuration View, an arrow button, which will open the
slideshow view, and an info button which opens the Information View
showing information about Evolved Art, these help pages, and a few
videos demonstrating how to use Evolved Art.
Adding Populations
You can create new populations or import existing populations using
the Add button at the top of the Library List. When you tap
on this button, you will be presented with an action sheet providing
options to create a new population or gene pool, or to import a
population or gene pool from iTunes.
When you tap on the action to create a new gene pool, you will be
presented with a simple popup allowing you to provide a name for the
new gene pool. Enter the name, and the gene pool will be created and
added to your Library List. When you tap on the action to create a
new population, you will be presented with a more complicated popup
to name and configure the new population. The popup is more
complicated because populations have many more attributes than
gene pools. While the popup is more complicated, you do not need
to be concerned with the details when you first start using Evolved
Art. The various configuration parameters for a new population will
become of more interest to you once you are more experienced with
evolving populations and wish to have more control over their
evolution.
Importing populations from iTunes will present you with
a popup listing the files that are available in iTunes. These will be
files that you exported from Evolved Art, or files that you received
from other Evolved Art users and copied into iTunes. These files will always
be population definition files, whose names end with the
suffix ".population". When you select a population from the list,
the population definition will be read, and the population will be
presented in the Import Population view. Here you can preview the
population to decide if you really wish to import it. The Import
Population view provides to buttons that allow you to import the
population into a gene pool, or into a population that can evolve.
Finally, populations can be added to your library when population
definitions are opened in other iPad apps. For example, if another
user emails a population definition to you, you can request the
mail app to open the definition file in Evolved Art (for example by
tapping and holding on the attachment's icon when viewing the email).
When this is done, the Evolved Art app will be opened and a preview
of the population will be presented to you, giving you the option
to import the population into the User Population or Gene Pool
section of your library.
Please note that importing populations from iTunes, as well as opening
populations from other iPad apps can only be done from the Library View.
If you are currently in another view, an alert will be presented to you
informing you of this limitation, and you will need to return to the
Library View and import or open again.
New Population PopUp
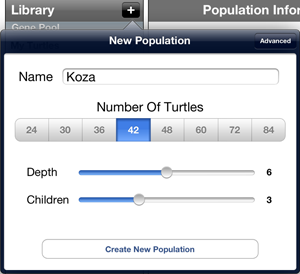
The first page of the New Population popup is relatively simple.
You provide a name for your population, as well as a size. The
name entry field is a traditional text entry field, so just click
in it and the keyboard will appear to allow you to type. The size
is determined by selecting one of the available sizes in the
Number Of Turtles segment bar below the name field.
Below the Number Of Turtles control, you will see two sliders:
one that controls the Depth, and one that controls
Children. The purpose of these settings involves an
understanding of turtle programs and their representation as
expression trees.
The depth setting determines the maximum height
of the generated expression trees. The greater the depth setting,
the deeper the expression trees can be. The children setting
determines the maximum number of children that any function
node in the expression tree can have. You may think of this setting
as a limit on the width of the expression tree. The
important thing to understand is that these two settings
control the overall size of the programs that are randomly
generated for your turtles. The larger these two settings,
the larger and more complex the turtle programs will be.
More importantly, the larger these two settings are,
the more memory the population will require. If these
settings are both set to their maximum values, you will see
a warning about memory requirements. It is possible that
Evolved Art will exhaust the memory on your iPad when attempting
to work with the population and be forced to shutdown.
Finally, you tap the Create New Population button to create
the new population and add it to your library. The popup will
be dismissed, and you will see the new population in the Library
List view.
Advanced Parameters
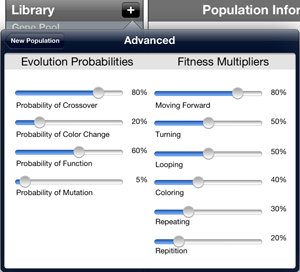
If you click on the Advanced button in the toolbar at
the top of the New Population popup, the popup will present the
Advanced Parameters view. When you first start to use
Evolved Art, you should simply accept the default values.
However, as you become more advanced, and better understand
the mechanics of evolution in your populations, you may wish
to modify these parameters to better control the evolution of
your population.
The left side of the view provides slider controls for
Evolution Probabilities, while the right side of
the view provides slider controls for Fitness Multipliers.
These values are described in more details below.
Evolution Probabilities
The internals of Evolved Art's evolution involves many events
that are determined by chance. You can think of this
as flipping a coin - heads the event goes one way, tails it
goes the other way. These probability settings determine the
odds of getting a head or a tail. If you select 80%, then the
coin toss will generally produce 80 heads for each 100 flips,
and 20 tails for each 100 flips.
- Probability Of Crossover
-
This probability applies to the probability that when
two turtles reproduce with each other, their DNA will
actually cross over and recombine. When the
coin is tossed, heads will cause crossover to occur,
and tails will leave the two turtles with their
original DNA. In this case, the DNA in question is
the turtles' programs. Clearly, you will want this
value to be high, unless you wish for the population
to evolve at a very slow pace.
- Probability Of Color Change
-
This probability applies to the likelihood that when
the turtle programs are first generated randomly, or
when mutation occurs, that the program instruction
that is created will involve changing the turtle's
drawing color. In other words, the higher this
probability, the more likely the turtle's drawing
will change colors.
- Probability Of Function
-
This probability applies to the likelihood that when
the turtle programs are first generated randomly, or
when mutation occurs, that the program instruction
that is created will be a function, as
opposed to a terminal. Function and terminal
are concepts in program languages and parsing. If
they are unfamiliar to you, do not worry. Simply
understand that the higher this probability, the
more complex your turtle programs will be.
- Probability Of Mutation
-
This probability applies to the likelihood that when
a population is evolved into the next generation
mutation will occur. The details of how Evolved Art
implements mutation is discussed elsewhere. Just
know that the higher this probability the more
mutation will occur during evolution.
Fitness Multipliers
When Evolved Art evolves a population into the next generation,
it does so by selecting turtles to reproduce and having those
turtles produce offspring. The selection of the turtles that
reproduce is based on their fitness. The more fit
a turtle is, the more likely it is to be selected for reproduction.
The fitness is determined by the properties listed below. These
multipliers are used to increase or decrease the importance
of each property. The higher the multiple, the more important
the property.
- Moving Forward
-
This property is in regards to how much the turtle
moves forward. When you see a line drawn in
the turtle's drawing, it is moving forward.
- Turning
-
This property is in regards to how much the turtle
turns. When you see the line in a turtle's
drawing change direction left or right, it is turning.
- Looping
-
This property is in regards to how much the turtle
loops. A loop occurs when the turtle turns
left or right by 360 degrees, or a complete turn around.
- Coloring
-
This property is in regards to how often the turtle
changes color while it is drawing.
- Repeating
-
This property is in regards to how often the turtle's
program repeats certain parts of the program.
The turtle program language includes instructions that
repeat sections of the program. When the program includes
these repeat instructions, this property applies.
- Repetition
-
This property is in regards to repeats in the turtle's
program and the repetitions they create. A
repeat instruction has a count. For example,
repeat 5 times. Repetitions are in regards
to the sum of the counts of the repeats that occur in
the turtle's program.
 next to the population's name in the Library List,
or you can tap on the Show Population button at the bottom of
the Population Detail view. Either of these taps will present the
Population View. Adding new populations to your library is
next to the population's name in the Library List,
or you can tap on the Show Population button at the bottom of
the Population Detail view. Either of these taps will present the
Population View. Adding new populations to your library is